What's a CLI?
A CLI (command line interface) is a program that accepts text input to execute a certain command. Back when
old computers terminals were still around, using a CLI was the only way to access and control a machine. Nowadays, almost everything
is a GUI. A regular user isn't gonna' use mkdir to create a new folder when they can just
right-click and hit "New Folder", but if you're reading this article, you're not a regular user — you're probably a software
developer or system administrator. If that's the case, a CLI is your second home.
For a developer or sysadmin, CLIs are used for various things: installing software, configuring, accessing network settings, etc. Additionally, they're just fun to use, which is why I decided to build my own CLI application using Node.js.
Prerequisites
Believe it or not, building a CLI application is pretty simple; in this tutorial, I'll show you exactly how you can build your own. Before starting, there's a few things you'll need:
- Node.js - Node.js is a server-side runtime environment that lets you run JavaScript outside a web browser.
- npm - By default,
npm comes pre-installed with Node.js. If you already have Node.js, chances are, you also have npm. To check if npm is
installed on your machine, type
npm -vinto the command line. - Terminal emulator - A CLI runs on a terminal emulator, so this prerequisite is pretty obvious. There's many different terminal emulators to choose from, but since this project will be built inside VS Code, you can use it's built-in Terminal.
...once you have everything, initialize a new directory on your machine with the name of your project and open it on VS Code.
Creating an npm package
In order to create a CLI application, there's a few dependencies you need. After making your application, I'll also teach you how to deploy your CLI as an npm package. To do that, you first need to set up a new package:
$ npm init
...this will ask you a few questions about your project before initializing a new package. Once that's complete, you should have a package.json
file. By default, dependencies are imported using the CommonJS syntax (require). For this project, I want to import the
dependencies with the ES6 Modules syntax (import). To change this, open the package.json
file and set a type...
// ...
"type": "module",
// ...
...next, add an npm script to run the program. The .js filename will be whatever file holds your application.
In my case, the CLI will live inside a file called devtools.js...
// ...
"scripts": {
    "start": "node devtools.js"
  },
// ...
...finally, add a key/value pair for bin. Anything listed in the bin
section of the package.json file will be made available as a command...
// ...
"bin": {
    "devtools": "./devtools.js"
  },
// ...
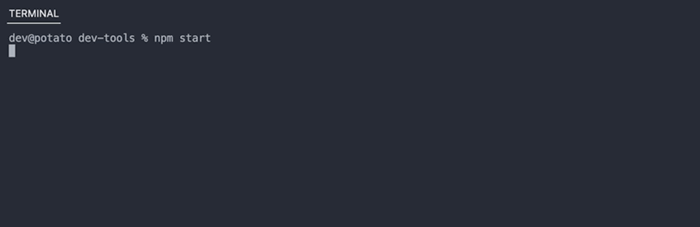
...this will allow me to run the CLI application by simply typing devtools into the command line.
Installing the dependencies
Now that everything is set up, you can install the dependencies via npm. Typically, a CLI application accepts user input. In order to make this possible, you'll need to install the inquirer.js package. For a bare-bones CLI, inquirer alone should suffice, but since I want my CLI application to have visual flair, I'll be installing additional dependencies. These dependencies will add things like ASCII art, animations, and colorful text. To install everything, type this into the command line:
$ npm install inquirer chalk chalk-animation figlet
...you can check the package.json file to make sure everything was installed.
Setting up your JavaScript file
Now that you've set up an npm package and installed all the necessary dependencies, you can finally start creating your CLI. In your project
directory, create a .js file with a filename that matches the one you chose as a path in your
package.json file. In my case, the file will be named devtools.js.
Inside the file, type this on the very first line:
#!/usr/bin/env node
...this is called a "shebang", and it should always be included when writing a command line script; it basically tells the OS to execute the code with Node.js. Next, import all the dependencies...
import chalk from "chalk";
import inquirer from "inquirer";
import figlet from "figlet";
import chalkAnimation from "chalk-animation";
...now, all the installed dependencies are ready to use.
Creating a prompt with inquirer.js
In order to process user input, you need to launch the prompt interface by using the .prompt() method,
which takes in two parameters: questions (as an array), and answers (as an object). As an example, take a look at the CLI menu I made for
my DevTools application:
async function devToolsMenu() {
  console.clear();
  const answers = await inquirer.prompt({
    name: "chosenTool",
    type: "list",
    message: "WELCOME TO DEVTOOLS!  SELECT A TOOL TO USE:",
    choices: [
      "Random Color Generator",
      "Decimal-to-Binary Converter",
      "Countdown Timer",
      "Digital Clock",
    ],
  });

  let chosenOption = answers.chosenTool;
  switch (chosenOption) {
    case "Random Color Generator":
      runRandomColorGenerator();
      break;
    case "Decimal-to-Binary Converter":
      runDecimalToBinaryConverter();
      break;
    case "Countdown Timer":
      runCountdownTimer();
      break;
    case "Digital Clock":
      runDigitalClock();
      break;
  }
}
...everything is inside the asynchronous function devToolsMenu, which I can call at any time to display
the prompt. The answers object contains question-related values, such as the type of prompt, the question to print,
and the choices. These can be found on the documentation page for inquirer.js.
In simple terms, the code snippet above translates to: "Create a list prompt that gives the user four tools
to choose from. Whatever tool they choose, store that decision inside a variable called chosenOption,
and create a switch statement with that variable in order to determine which tool to launch."
If the devToolsMenu function is invoked and I run devtools in the Terminal, the CLI
application should look something like this:
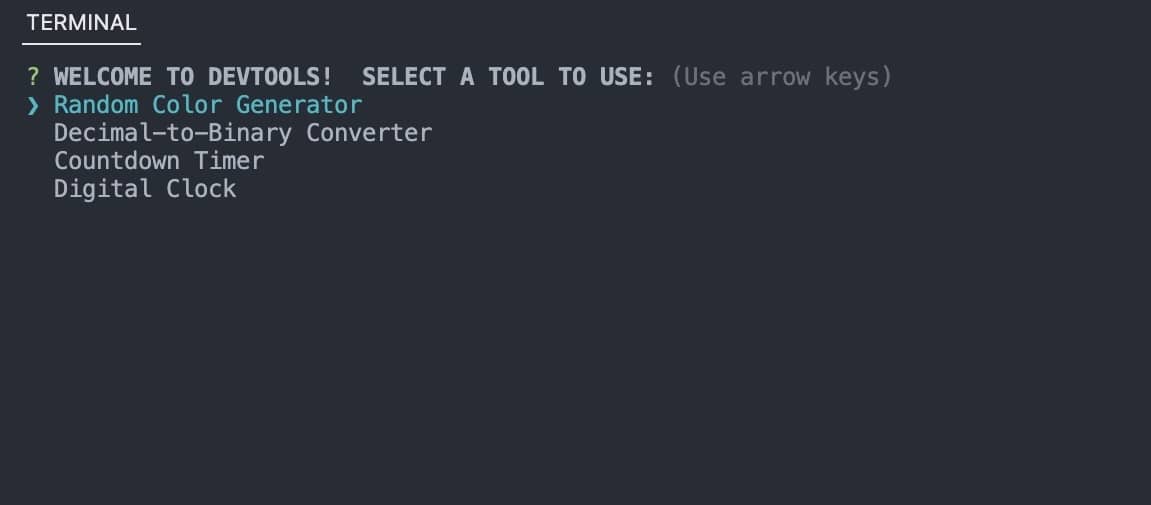
...pretty cool, huh?
Using figlet.js and chalk.js
As stated earlier, creating a CLI with only inquirer.js is totally possibly, but you'll probably end up with a plain and boring application. To fix this, I'll show you how to style your application with the other installed dependencies. As an example, I'll use the function for my countdown timer tool:
async function runCountdownTimer() {
  console.clear();
  const answers = await inquirer.prompt({
    name: "timerDuration",
    type: "number",
    message: "Set a countdown timer for how many seconds?",
    validate: (answer) => {
      if (isNaN(answer)) {
        return `Invalid number.  Press ${chalk
          .rgb(255, 255, 255)
          .bold("control + K")} and try again.`;
      }
      return true;
    },
  });

  let seconds = answers.timerDuration;
  console.clear();
  console.log(seconds);

  let timer = setInterval(() => {
    console.clear();
    seconds--;
    console.log(seconds);

    if (seconds == 0) {
      console.clear();
      clearInterval(timer);
      figlet("TIME!", function (err, data) {
        if (err) {
          console.log("Could not load 'TIME!' ASCII art...");
        }
        console.log(chalk.redBright.bold(data));
      });
    }
  }, 1000);
}
...here, I've created another prompt, except this one has a type of number,
which lets the user input a number. inquirer.js also eases the process of validating data with it's validate
property, which takes a function as a value. Inside that function, the application checks whether the user input was a number or not. If it was,
it'll return as true and start the countdown timer; otherwise, it'll return as false and display an error message.
By taking a closer look at my function, you can see the use of the figlet.js and chalk.js dependencies. figlet.js allows you to turn regular text into ASCII art, whereas chalk.js gives your text color. Here's how I implemented both dependencies into my countdown timer tool:
figlet("TIME!", function (err, data) {
  if (err) {
    console.log("Could not load 'TIME!' ASCII art...");
  }
  console.log(chalk.redBright.bold(data));
});
...calling the figlet object as a function takes three parameters: the input text, options, and a callback function.
Here, I've omitted the options parameter, using only the input text and callback function. Once the countdown timer reaches 0,
TIME! will be displayed in the Terminal in the form of ASCII art. To style it even further, I combined figlet.js
with chalk.js to make the text bright-red...
...now that's flashy, but I think I can make the application look even better!
chalk-animation.js — the icing on top
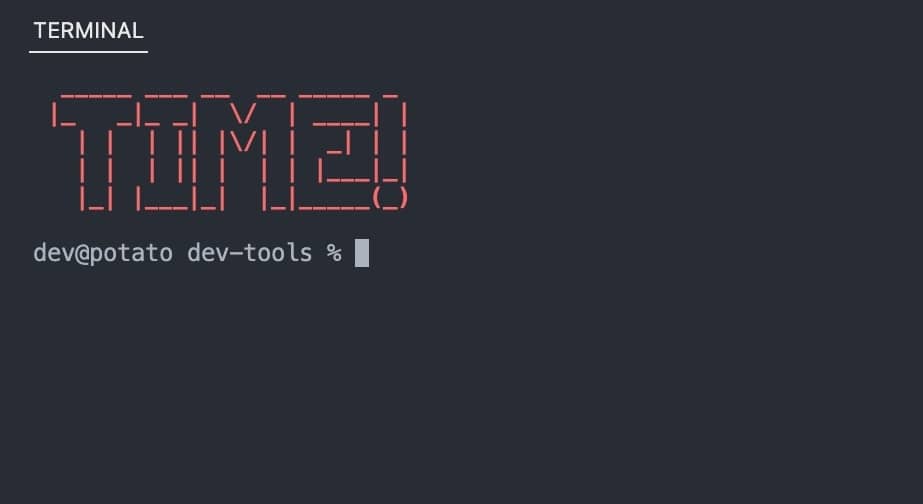
To finalize my CLI application, I decided to add a loading screen whenever the application launches. Achieving this was simple through the
implementation of a setTimeout function that invokes the menu function after 2 seconds:
figlet("DEVTOOLS", function (err, data) {
  console.clear();
  if (err) {
    console.log("Could not load 'DEVTOOLS' ASCII art...");
  }

  const loadingMenuScreen = chalkAnimation.rainbow(data);
  loadingMenuScreen.start();

  setTimeout(() => {
    loadingMenuScreen.stop();
    devToolsMenu();
  }, 2000);
});
...I wanted the loading screen to display the application name as ASCII art by using figlet.js again. To improve the loading screen even further,
I decided to use the chalk-animation.js dependency, which animates text. It comes with a few different animations, but my favorite was the
rainbow effect...
...needless to say, I was quite satisfied!
Using your CLI from anywhere
By default, your application will only run in the project directory. In order to execute your CLI from anywhere in the terminal emulator, type this into the command line:
$ sudo npm link
...this will ask for your password since it's a root user command. Now, your CLI can be executed from anywhere by using the command you
set inside bin.
Publishing your package to npm
Now that your application is complete, you can publish it to npm for the world to use. In order to do this, you first need to create an npm account, which you can do here. Once you've made an account, go back to your project and type this into the command line:
$ npm login
...this will prompt you to enter your username, password, and email. Make sure you've confirmed your email address and set up 2FA before
attempting to publish a package, otherwise, you might run into issues. The name of your npm package will match that of the
name value in package.json. If a package with that name already exists
on npm, you'll have to rename it. Finally, publish the package...
$ npm publish
...all done! Your CLI application should now be available as a package on the npm registry!
If you're interested in checking out my DevTools application, you can find it here as an npm package. Alternatively, you can also grab a copy of it from the Github repository!